Ok, I this was my first try at cleaning parts using electrolysis. It was such a huge success that I will most certainly use it in the future.
But first, a couple of SAFETY ISSUES , before I continue:
– The process will release small amounts of hydrogen, which is a highly flammable gas.
-Stainless steel as electrode: Apparently stainless steel can release chromium in to the liquid and in a gaseous form. This may have health implications after prolonged exposure.
>> So. Do this outside or in a well ventilated area.<<
Oh. And mixing electricity and water can be a bad idea, so use your common sense in that.
Other than that, the process is quite easy.
I will not explain the process compeletely as there are quite informative websites on the matter. Here’s a couple of links (or just Google electrolysis and part cleaning):
http://royalcrossfarm.com/electrolysis.htm
http://users.eastlink.ca/~pspencer/nsaeta/electrolysis.html
http://antique-engines.com/electrol.asp
The setup:
My test pieces were quite small, so I used a steel cup for positive electrode and regular salt instead of soda (Washing soda is recommended in most instructions. Salt works also, but it’s somewhat corrosive even without electric current – don’t forget the parts in the bath.).
I used a regular car battery charger (12 volt, 10 amp). The process also works on a regular car battery (fully charged preferably).
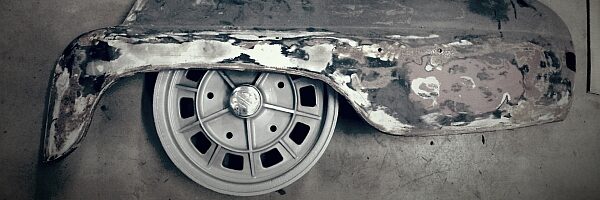
This is the part before cleaning.

It’s not in the worst possible condition, but it’s actually pretty small and as such difficult to sandblast or clean otherwise.
Electrolysis is an excellent way to clean iron and steel parts especially when they have minute detail or it has to be made sure they are not destroyed in the process of cleaning them up.
The process can be used on any electricity conducting metal, but for example aluminium can brake down faster than expected.
The process starts immediately when you switch the power on (you will see bubbles forming aroung the part that is attached to the negative lead).

Make sure you attach the part to be cleaned to the negative lead – NOT the positive (or you’ll end up with a very clean electrode and a possibly destroyed part).
Make sure you turn the power OFF before touching or moving anything. If you use a battery charger to give power, at the very least you will burn a fuse if the electrodes or parts touch each other when “hot”.
I actually used a stainless steel electrode here, but as I said in the safety notice – it is not recommended. However – stainless steel does last longer as an electrode than for example iron.
After a couple of hours the “soup” looks quite different. That is all rust and dirt from the quite small part I am cleaning.

And here’s part after three hours. Looks great. (Later I let it “bubble” for a couple of hours more, it became even nicer!)

You can use the process for quite a big parts. I know people who use it to clean brake calipers, engine parts, …
Note, that the cleaned part is very prone to rust after cleaning. Dry it immediately and thoroughly and preferably give it the correct surface treatment or spray some oil on it as soon as possible.